Notes : APC SmartUPS Battery Float Voltage Calibration
Too high a battery float voltage is a problem I've seen on many of my APC SmartUPS units, and one that appears to be rather common. Sealed lead acid batteries do not tolerate too high a standby voltage, and suffer from dramatically shortened lifespan when run at elevated voltages and temperatures. In the worst case, overcharging results in elevated temperatures and rupture of the battery case. Outside of warranty, APC is of no assistance, suggesting only that I purchase a new unit. (Helpfully, they offer a discount with the trade-in.) Nonetheless, I'd like to not think of $7-800 purchases as being disposable items.
I've long sought a manner to adjust or recalibrate the battery voltage on my SmartUPS SUA1500 RM2. It would also be nice to be able to adjust the battery charging voltage to use other types of batteries; e.g., flooded lead-acid marine or car batteries. This post describes, using information from a variety of sources, an approach to recalibrate the battery voltage and other measurements on SmartUPS devices by using the PROG mode available by serial connection. It also suggests a method for modifying the UPS circuit board when PROG doesn't work, as with my SU700 units.
Excessive charging seems to be a matter of drifting calibration: Within the period of 1 to 3 battery changes, the battery float voltage rises beyond the battery specifications. Most sealed lead-acid batteries specify a float voltage of 2.25-2.30V, or 13.5-13.8V per battery.
It is my understanding that older BackUPS units could be adjusted with a potentiometer on the board. Calibration of newer models, and the SmartUPS line is factory set in the unit's micro-controller. APC is of no assistance with units that are out of warranty. I've recently found information of how to recalibrate the battery float voltage through reprogramming the battery gain, and some information about modifying the UPS hardware, described below. I can't take credit for discovering methods demonstrated, but hope it will be useful to another to have a coherent description.
Questions, Comments, & More information
I receive quite a few emails about this article, and am happy to discuss more. I try to keep this page updated with what we learn. Please send me an email if you have any lingering questions or know something that would be useful to add here. I'm at jacob@jjoseph.org.
Calibrating by serial cable
An excellent description for the APC SmartUPS protocol is available from the Network UPS Tools Protocol Reference. This describes how one may communicate with the UPS in standard use.
A post to the NUT users mailing list by an Alexander Talos describes setting several additional calibration variables by using PROG mode: Hidden Programming Mode. In PROG mode, notable adjustments include battery voltage gain, load gain, line voltage gain, and on-battery voltage output.
PROG mode may be used by connecting to the UPS with a serial console (2400bps, 8N1, no flow control), and sending "1", twice, at least a second apart . The UPS will respond "PROG" once you've succeeded. You can leave PROG mode by sending "R" (response: "BYE"), which will put the UPS in dumb mode, followed by "Y" (response: "SM") to re-enter smart mode.
Once in PROG mode, sending the character corresponding to a setting will lead to the UPS printing the current value of that measurement (e.g., 27.67 for battery voltage). Settings are programmed by the next values received. For multi-character values, the appropriate number of characters will be read. For gain parameters, the gain of this value may then be adjusted by sending one or more "-" or "+" characters to decrement or increment the gain. At each press of "-" or "+", the UPS will reply with the current gain value.
"B" may be used to calibrate the battery voltage gain. On my unit, the stock setting of "E9" resulted in about 27.35V at the batteries. Adjusting this to "E6" lowered the voltage to my desired 27.30 (2.275V/cell). Note that my goal was to get the voltage correct at the batteries, not necessarily have the UPS report the same voltage as my voltmeter. After adjustment, the UPS still reports a voltage of 27.67. Perhaps some other calibration measure may be used to change this inconsistency, but I don't know about it.
I am unsure of how universal this procedure is across the APC SmartUPS series. Apparently, battery gain is adjustable on the SU2200, and I have tested on my SUA1500. However, with my SU700, adjusting "B" doesn't seem to change the voltage I measure at the battery.
Here's a list of other settings:
- B: Battery voltage gain.
0=maximum gain, FF=minimum gain. Adjust with the batteries fully charged, and an accurate voltmeter connected. Factory setting was "E9" on my SUA1500, and "E6" gives me the desired 27.30V battery voltage. "FA" reported for SU2200 in above post. - L: Line voltmeter gain
Apparently a setting of 0 will lead the UPS to not detect any input power. Factory setting is "DD" on my SUA1500. "EA" reported for SU2200 in above post. - P: Power load gain
Factory setting is "D6" on my SUA1500. - o: On battery output voltage
Factory setting is "120" on my SUA1500. It doesn't appear adjustable on this unit: "+" or "-" responds "NO".
Some other values are described in Alexander's post, above. I do not know of additional documentation for PROG mode, and am afraid to try every combination for fear of bricking the unit.
Battery Makes and Models
The particular batteries used in these UPSs can make a big difference in both performance (runtime) and longevity. Stating the obvious, some brands are of high quality and other are not. These differences may not matter in many applications, but UPSs require both high capacity and high current, pushing the limits of lesser batteries.
Beyond this, even among the best brands, there appear to be relevant differences in the tolerances. Given the tendancy for APC units to float high, it is worth purchasing batteries that have even very modest increases in their charging tolerances or maximum current. I tend to not trust the manufacturer specifications, especially from "low quality" companies, leading me to buy and recommend very specific models.
I should note that I've learned much about batteries over the years through very helpful telephone conversations with the Andy at batteriesASAP.com. I definitely recommend them as a good source of batteries.
Here are a few notes of my experiences:
- Universal Battery
- These batteries are rather inexpensive compared to many others.
I believe they have a reputation of poor quality. Consistent with
this, I have had very poor luck with them wearing out, and failing
in both an SU700 and SU1500. I have used the UB1290 (12V 9Ah) and
UB1280 (12V 8Ah).
- PowerSonic
- My understanding is that PowerSonic is a very highly regarded
battery manufacturer. I tried a set of PS-1290F2 (12V 9Ah)
batteries in an SU1500, and found them to run cool, and provide
sufficient capacity. However, after 18 months, they began to fail,
with effectively no voltage across the terminals. I've been told
that while these are very good batteries, they are not designed for
high current use. I run the SU1500 in which they failed at about
10% capacity, so the currents drawn should have been modest. I
investigated correcting the float voltage only after these
batteries failed.
- CSB
- These batteries are reputedly of very high quality. They are designed for rough usage at high currents. I believe APC uses CSB batteries as their stock battery, which also lends confidence to their selection. (However, I have had many APC units with stock batteries overheat and cause expanded, leaky batteries.) I have used the HR1234WF2 (12V 9Ah) battery in the SU1500 most mentioned on this page, and SU700 models (which have uncorrected float voltage). Two years later, all are still running perfectly.
Modifying the circuit board
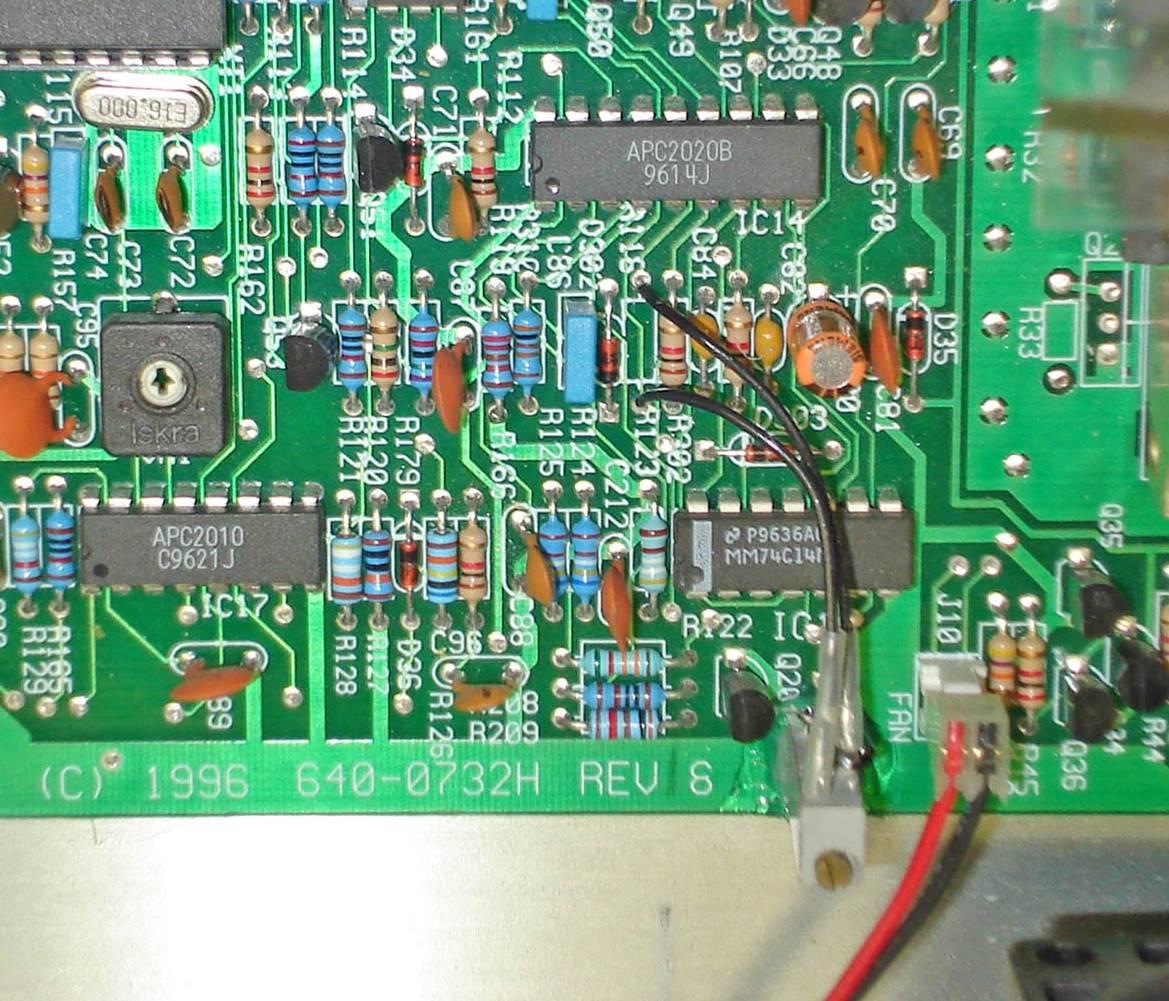
Another avenue for calibration is to modify the circuit board. Before finding the above PROG mode documentation, I was headed this route. It is likely that the calibration drift at fault is caused by drifting component values, so why not change them back? According to a DanielD67 at diyforums.net, "...how to adjust the voltage on Smart-UPS 1000: the charging control circuit is IC14 APC2020 and on pin 13 is a resistive divisor of +24VFET formed by R118-100k and R119-22K1. Reducing R118 by adding another 5M6 you can reduce the charging voltage at 27.4V." (Battery Float Voltage Adjustment?)
As adjusting "B" in PROG mode did not work with my SU700 unit, I'll see what I can do to adjust its voltage, and report back here.
APC SmartUPS 1400RMNET Modification
After an email exchange with a Darrell Nickolaus about a troublesome APC SmartUPS 1400 RMNET, he graciously provided the following writeup to document physical modification of the float voltage. I do not know whether PROG mode works in that unit. ~Jacob
Problem: Short Battery Life
Power-Sonic, PS-1270 F2 batteries were installed about 2 years ago. When they failed, they showed evidence of excessive heat; the cases were swollen and deformed.
Using a "test set" of batteries, the float voltage was measured at 27.94 V. Reference data from the Power-Sonic web site calls for a 2.25 – 2.30 V float voltage per cell. This translates to 27.00 – 27.60 for a 24 volt pack.
Solution: Adjust the Float Voltage
APC Support declined to give float voltage adjustment guidelines and they would not provide a schematic. A web search revealed many comments about APC Smart-Ups’ float voltage drifting up as the unit ages. An article by Jacob Joseph was very helpful. (Ref. here.) His article was written with reference to a 1500 VA model. The two circuit boards are probably identical in this area. After reading his discussion about calibrating by serial cable, I opted to modify the circuit board which he also outlined. After reading his discussion of calibrating by serial cable or modifying the circuit board, I opted to modify the circuit board. A few of my own ideas resulted in a very quick and precise method of adjusting the float voltage. With new batteries installed and the unit running, the battery voltage was monitored at the terminals. This modification has the additional advantage that the float voltage can be quickly adjusted in the future after simply removing the cover.
Procedure: Replace Resistor with Trim POT
Mr. Joseph's article makes reference to IC 14 (APC2020) and a voltage divider on pin 13 which is composed of R118 – 100K and R119 – 22K. R118 was best identified by the silk screen on the bottom of the circuit board in my case, but I verified the circuit with an ohmmeter also. I removed the 100K resistor and found that it was still within tolerance, but replaced it with a 20 turn, 100K trim pot. The trim pot was mounted on end (screw adjust facing up) with RTV. The ideal location was at the edge of the circuit board by the fan connector. This placed it right at the edge of the platform where the main transformer is mounted. Two short leads from the trim pot went over to the mounting holes where the fixed resistor was located. It is always good practice to tie the wiper of the trim pot to one end of the pot. Another good practice is to label what you have done so that trim pot can be identified a few years later when you have forgotten or somebody else is looking at it.
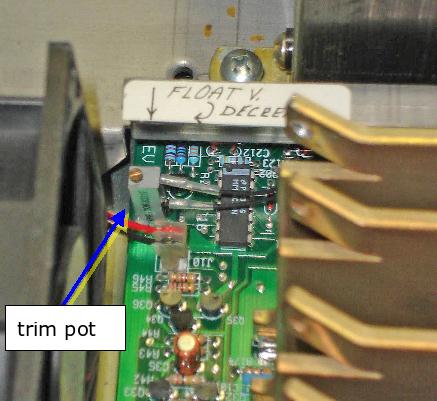
As a starting point, I set the trim pot to the same value as the fixed resistor it replaced. With my charged "test set" of batteries, I adjusted the float voltage down to 27.4 V. The final trim pot resistance was 98.3k ohm. Later, that voltage can be tweaked with the new batteries installed and charged. The 20 turn trim pot gives the capability to adjust within 0.01 volts, so adjustment is no problem.
This size of UPS is too good and too expensive to be considered a throw-away item. I expect this small modification can give these units several more years of useful service. I hope others can benefit from this improvement as well.
Last Modified: 06 Jul 2011